Connecting Components
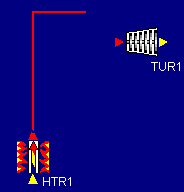
- To connect two icons, first click on a
port, such as the top port of the heater:

- Note that the port you clicked on
turns green, and a green line appears, attached to the
port and to the mouse pointer. This line can only be
horizontal or vertical (to simplify the layout of
diagrams); to change direction, click to create a right
angle joint. Also note that all ports to which you could
connect this line have turned green. In the above figure,
the inlet to the turbine has turned green, but the
turbine's outlet has not, because you cannot connect two
outlets to one another.
- Now that you have clicked on a port,
you must first drag the green line some distance away
from the icon in the direction of flow (i.e., the
direction in which the port arrowhead points). Above
all, resist the temptation to start the connection by
immediately moving at right angles to the direction of
flow, because the interface won't let you do that in this
version of CyclePad.
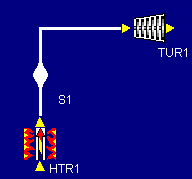
- Having dragged the green line for
some distance, click when you want to make a right angle
change in direction. Don't worry about lining up exactly
with the port to which you want to connect. CyclePad will
automatically "snap" the connecting line to the
second icon. In the above example, the joint is clearly
above the inlet to the turbine, but if you simply click
on the green inlet port of the turbine, the connection
will be correctly made:

- If you decide that you want to abandon the connection operation, a right click will
restore the screen to its state prior to initiating the
connection.
- When the connection is completed (by
clicking on the second port), a stuff appears, indicated
by the bulge in the "pipe" connecting the
heater to the turbine. Like each device, each stuff has a
unique label, which you can drag to make your diagram
easier to read and edit in Build mode.
 See also::
Creating a New Design
Adding Components to the Design
Changing the Labels of Components and Stuffs
Manipulating Component Icons
Deleting Stuffs
Back to Projects page | Back to Resources page | Back to Software page | Back to QRG Home Page


 See also::