
Figure 1: Vapor-Compression Refrigeration Cycle
T-s diagram
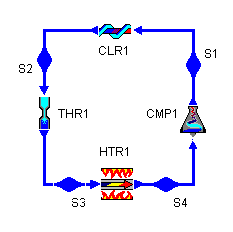
Figure 2: Basic refrigeration cycle layout |
|
Example Design Constraints
Cooling requirements
For purposes of illustration, we will assume that a refrigeration system used to cool air for an office environment. It must be able cool the air to 15.5°C (about 60°F) and reject heat to outside air at 32°C (90°F).
the working fluid
We have several working fluids available for use in refrigeration cycles. Four of the most common working fluids are available in CyclePad: R-12, R-22, R-134, and ammonia. (Nitrogen is also available for very low temperature refrigeration cycles.) We will choose R-22 for this example.
Description of Cycle Stages
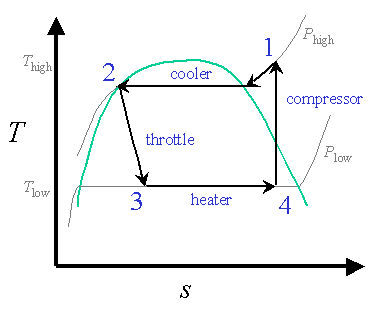
We will examine each statepoint and component in the refrigeration cycle where design assumptions must be made, detailing each assumption. As we can see from the example design constraints, very few numbers need be specified to describe a vapor-compression refrigeration cycle. The rest of the assumptions are determined by applying reasoning and background knowledge about the cycle. The two principle numerical design decisions are determining Phigh and Tlow, at the cooler outlet and the compressor inlet.
The cooler (also known as the condenser) rejects heat to the surroundings. Initially, the compressed gas (at S1) enters the condenser where it loses heat to the surroundings. During this constant-pressure process, the coolant goes from a gas to a saturated liquid-vapor mix, then continues condensing until it is a saturated liquid at state 2. Potentially, we could cool it even further as a subcooled liquid, but there is little gain in doing so because we have already removed so much energy during the phase transition from vapor to liquid.
We choose Phigh so that we can reject heat to the environment. Phigh is the same as P2, and P2 determines the temperature at state S2, T2. (T2 is just the saturation temperature at Phigh). This temperature must at least be higher than that of the cooling source, otherwise no cooling can occur.
However, if T2 is too high (that is, higher than the critical temperature TC for the working fluid), then we will be beyond the top of the saturation dome and we will loose the benefits of the large energy the fluid can reject while it is being cooled. Furthermore, it is often impractical and unsafe to have very high pressure fluids in our system and the higher P2 we choose, the higher T1 must be, leading to additional safety concerns. To find an applicable pressure, use the saturation tables to find a pressure which is somewhere between the saturation pressure of the warm air yet still in the saturation region.
For reference, TC for our four working fluids are given below.
For our example using R-22, we must be able to reject heat to air that is 32°C. We can choose if T2 to be anywhere between that number and the 96°C TC. We'll choose it to be 40°C for now.
The usual design assumption for an ideal heater in a refrigeration cycle is that it is isobaric (no pressure loss is incurred from forcing the coolant through the coils where heat transfer takes place). Since the heating process typically takes place entirely within the saturation region, the isobaric assumption also ensures that the process is isothermal.
Of course, we would get the same isothermal behavior if we were to start the compression before the fluid was completely saturated. Further, there would seem to be a benefit in that statepoint S1 (see Figure 1) would be closer to the saturation dome on the Phigh isobar, allowing the heat rejection to be closer to isothermal and, therefor, more like the Carnot cycle.
Tlow occurs within the saturation dome, so it determines Plow as well. We know that Tlow must at least be cooler than the desired temperature of the stuff we wish to cool, otherwise no cooling will occur. An examination of the saturation tables for our refrigerants shows that setting Tlow at, for instance 15° C, still allows for fairly high pressures (4 to 7 atmospheres, typically). So, while this tells us how low Plow must be, it does not tell us how low it can be.
There are several major practical considerations limiting Plow. Fundamentally, we must concern ourselves with the properties of our working fluids. Examination of the saturation table for R-22 shows that at atmospheric pressure, the saturation temperature is already very cold (about -40°C). For small-scale air-conditioning applications, we have no desire to create a stream of extremely cold air, both due to safety concerns and because cold air holds very little moisture and can be uncomfortably dry. For larger-scale applications, this is less of a concern because we can always mix the cold, dry air with warmer, wetter air to make it comfortable.
Another hardware consideration is that it is fairly difficult to maintain a very low-pressure vacuum using the same compressor that will achieve high pressure at its outlet. Choosing a Tlow that results in a Plow of 0.1 atmospheres is probably not practical if we intend to have Phigh up near 10 atmospheres.
This brings us to the other reason we cannot make Tlow too small. Examining Figure 1 again, we see that the lower Plow is, the further out to the right (higher entropy) the saturated vapor will be at statepoint S4. Statepoint S4 has the same entropy as S1, and the further to the right S1 is along the Phigh pressure isobar, the hotter S1 must be. This high temperature is undesirable from both efficiency and safety standpoints.
The figure below shows the relationship between Tlow and the cycle's coefficient of performance (COP). We note that the higher Tlow, the better the COP. The practical limit on Tlow is heat transfer rate in the evaporator; having Tlow too close to the temperature of the stuff we wish to cool results in low heat transfer rates.
Download the CyclePad design of the refrigeration cycle. Whalley, P.B. 1992. Basic Engineering Thermodynamics.
Oxford University Press. ISBN: 0-19-856255-1 Haywood, R.W. 1980. Analysis of Engineering Cycles.
Pergamon Press. ISBN: 0-08-025440-3
Go to
Contributed by: M. E. BrokowskiCooler (Condenser) inlet (S1)
This state need not involve any design decisions, but it may be important to come back here after the cycle has been solved and check that T2, which is the high temperature of the cycle, does not violate any design or safety constraints. In addition, this is as good a place as any to specify the working fluid.
Cooler (Condenser): Heat Rejection (CLR1)
Cooler (Condenser) outlet (S2)
We cool the working fluid until it is a saturated liquid, for reasons stated above. An important design question arises at this state: how high should the high pressure of the cycle be?
Critical Temperatures
of some refrigerants
substance
TC (°C)
R-12 (CCL2F2)
111.85
R-22 (CHCLF2)
96.15
R-134a (CF3CH2F)
101.05
ammonia (NH3)
132.35

Figure 3: Vapor-Compression Refrigeration Cycle
COP versus Thigh in the cooler
Throttling (THR1)
The high-pressure, saturated liquid is throttled down to a lower pressure from state S2 to state S3. This process is irreversible and there is some inefficiency in the cycle due to this process, which is why we note an increase in entropy from state S2 to S3, even though there is no heat transfer in the throttling process. In theory, we can use a turbine to lower the pressure of the working fluid and thereby extract any potential work from the high pressure fluid (and use it to offset the work needed to drive the compressor). This is the model for the Carnot refrigeration cycle. In practice, turbines cannot deal with the mostly liquid fluids at the cooler outlet and, even if they could, the added efficiency of extracting this work seldom justifies the cost of the turbine.
Heater (Evaporator): Heat Absorption (HTR1)
The working fluid absorbs heat from the surroundings which we intend to cool. Since this process involves a change of phase from liquid to vapor, this device is often called the evaporator. This is where the useful "function" of the refrigeration cycle takes place, because it is during this part of the cycle that we absorb heat from the area we are trying to cool. For an efficient air conditioner, we want this quantity to be large compared to the power needed to run the cycle.
Compressor Inlet (S4)
Where do we want S4?
Typically, we want state S4 to be right at the saturated vapor side of the saturation dome. This allows us to absorb as much energy from the surroundings as possible before leaving the saturation dome, where the temperature of the working fluid starts to rise and the (now non-isothermal) heat transfer becomes less efficient.
It turns out that, for increased efficiency, we can choose S4 such that S1 is on the saturation dome, instead of outside of it in the superheat region. Figure 4 shows the T-s diagrams for two refrigeration cycles, one where S4 is a saturated vapor and the other (in light green) where S4 has been moved further into the saturation dome to allow S1 to be a saturated vapor.
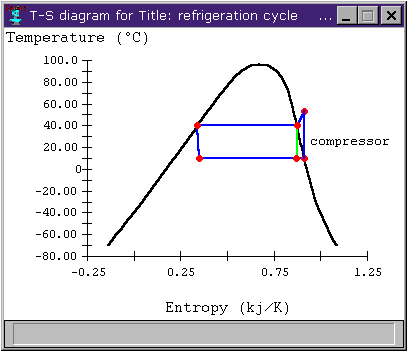
Figure 4: T-s diagram for different compressor conditions
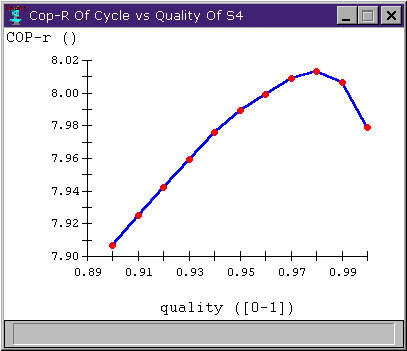
Figure 5: COP versus compressor inlet quality
How to choose Tlow
This brings us to another design issue: Now that we know that S4 is on the saturated vapor line, where on the line is it? In other words, how low can Tlow go?

Figure 6: Vapor-Compression Refrigeration Cycle
COP versus Tlow
Compressor (COMP1)
Ideal compressors are like ideal pumps, adiabatic and isentropic. We also note that the compressor is the only device in the system that does work to the fluid. For an efficient air conditioner, we want this quantity to be small.
CyclePad Design Files
Related Entries
Sources


or

Initial Entry: 12/14/97
Last Edited: 12/16/97
For comments or suggestions please contact CyclePad-librarian@cs.northwestern.edu