Creating a New Assignment
When creating an assignment using the Assignment Builder, the wizard takes us through several dialog boxes to guide us through the process.
Naming the Assignment File
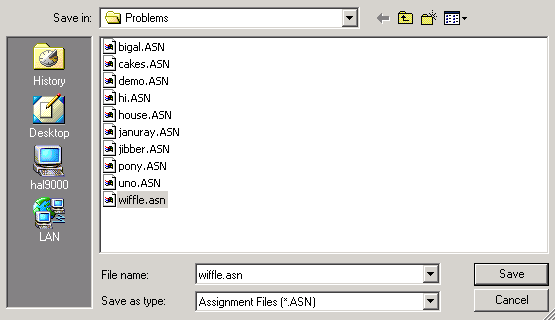
When we create a new assignment, the first step is to give a file name under which the assignment will be saved.
Basic Assignment Information
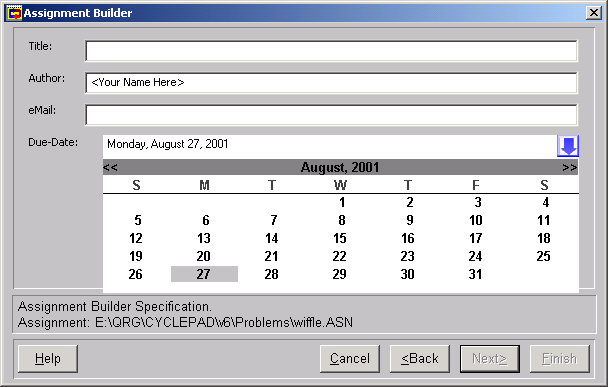
Once a file name has been chosen, we click "Next" which takes us to a dialog allowing us to specify the assignment's title, it's author (the instructor), the author's email address (to which assignment grade reports will be sent for assignments graded electronically), and the assignment's due date. The due date is specified using the pull-down calender at the right of the due date field.
Setting Up the Problem
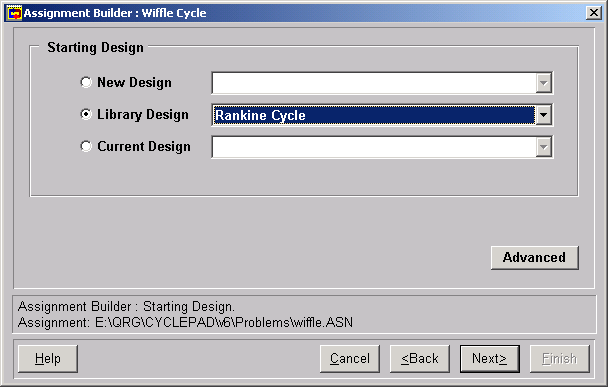
Next, we specify what design the student sees as he opens the assignment. We can choose several options.
· A new design. The student must build the assignment from scratch from the text description of the system.
· A CyclePad library design. The student starts with one of the designs in CyclePad's built-in library of examples. The student may modify these to complete the assignment.
· The current open design. If the instructor has a particular starting point in mind for the students, he can create that design on his own and have it open when entering the Assignment builder. Such designs may be at whatever level of completeness the instructor chooses.
In the assignment shown above, we have chosen a Rankine cycle as the students' starting point. Note that this is just the Rankine Cycle, and not the Rankine Cycle Solved, so no numerical data has been entered. The student will have to do that. Of course, had we chosen one of the solved library cycles (or provided one ourself), the student would have all of that design's data already entered. In this way, we can design introductory assignments where students have a chance to learn from the ground up and also more advanced assignments where the student need not spend unnecessary time on well-understood material.
Similar to those available under the Edit|Preferences menu item, this dialog contains a button for more advanced options1KGX9_. From here the instructor might choose to specify certain advanced behavior, such as that CyclePad use the slow-but-safe method when doing sensitivity analysesInvestigating_a_Cycle_via_the_Sensitivity_Analysis_Tool. Here also can be chosen units, though the units of the starting design are used by default.
Adding Assignment Instructions and Questions
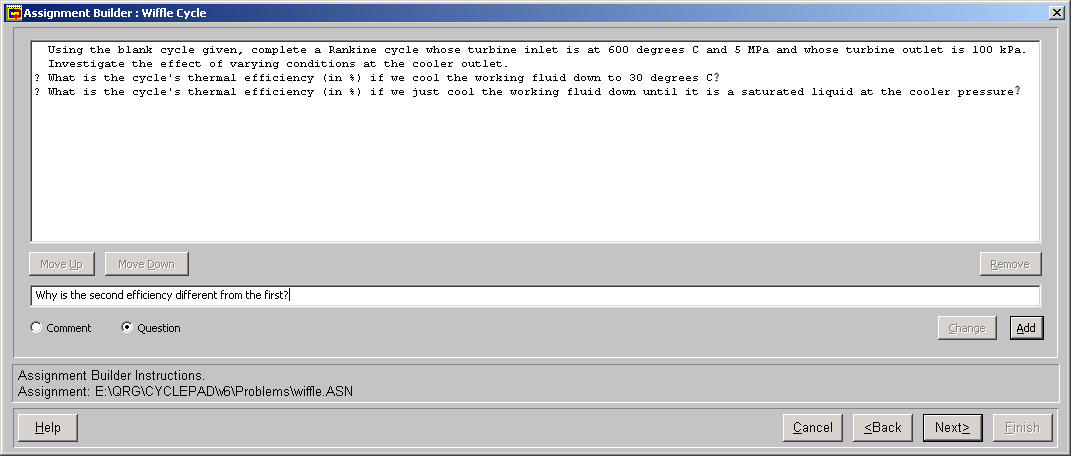
In the next dialog in the Assignment Builder Wizard, we provide the text description of the assignment, along with any instructions and the questions to be answered by the students.
Any description of the system and any instructions are "comments" and any questions for which the students must provide an answer are "questions". For each question specified here, the student will see a blank text box in which to provide answers when working on the assignment. Once a question or comment is written, we click "Add" to add it to the list that students will see when they work on the assignment. To change a question or comment, click on it then change it and then click "Change" to update the list.
Adding Problem Constraints
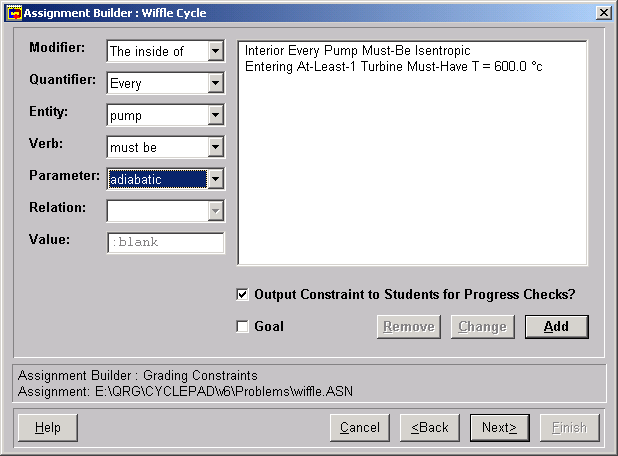
The next dialog allows specifications of constraints that the students should follow when completing their design. The pull-down menus at the left allow each constraint to be specified in a way that CyclePad understands. Once each constraint is specified "Add" it to the list at the right. We can have as many constraints as we want, being careful not to overconstrain a problem.
In the example shown above, we have already specified that all the pumps are isentropic and that the fluid entering the turbine is at 600 degrees C. We are about to add a constraint that all pumps are adiabatic. Note that we can choose to allow the students to see some or all of the constraints so that they can check their own progress. We can also specify a goal constraint which will be tallied when the submitted assignment is graded.
Registering the Assignment File
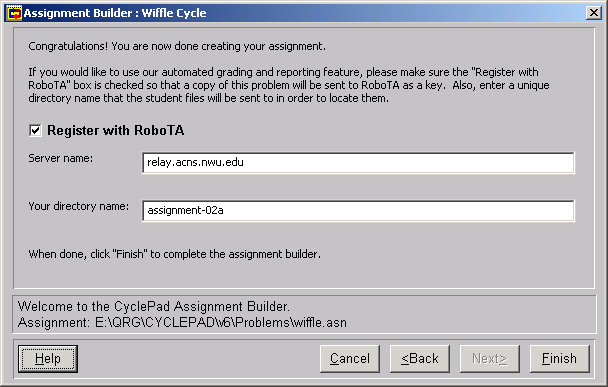
The final dialog in the Assignment Builder allows us to save the assignment file and creates the problem file, which the students receive. In addition it allows us to register the assignment with a RoboTA email post office and grading agent and specify in which directory on the RoboTA server the submitted assignments will be stored.
Of course, Registration with a RoboTA is not mandatory. Students can be instructed to submit their assignments directly to the instructor or his proxy for grading. Completed problem files can be opened and examined in CyclePad just as any design file can.
Whether or not it is desired to register the assignment with RoboTA, it is necessary to hit "Finish" to ensure that the problem file is created and the assignment file is saved.
What the Student Will See
When a student opens up the problem file (wiffle.prb in this example), he will see something like the following.
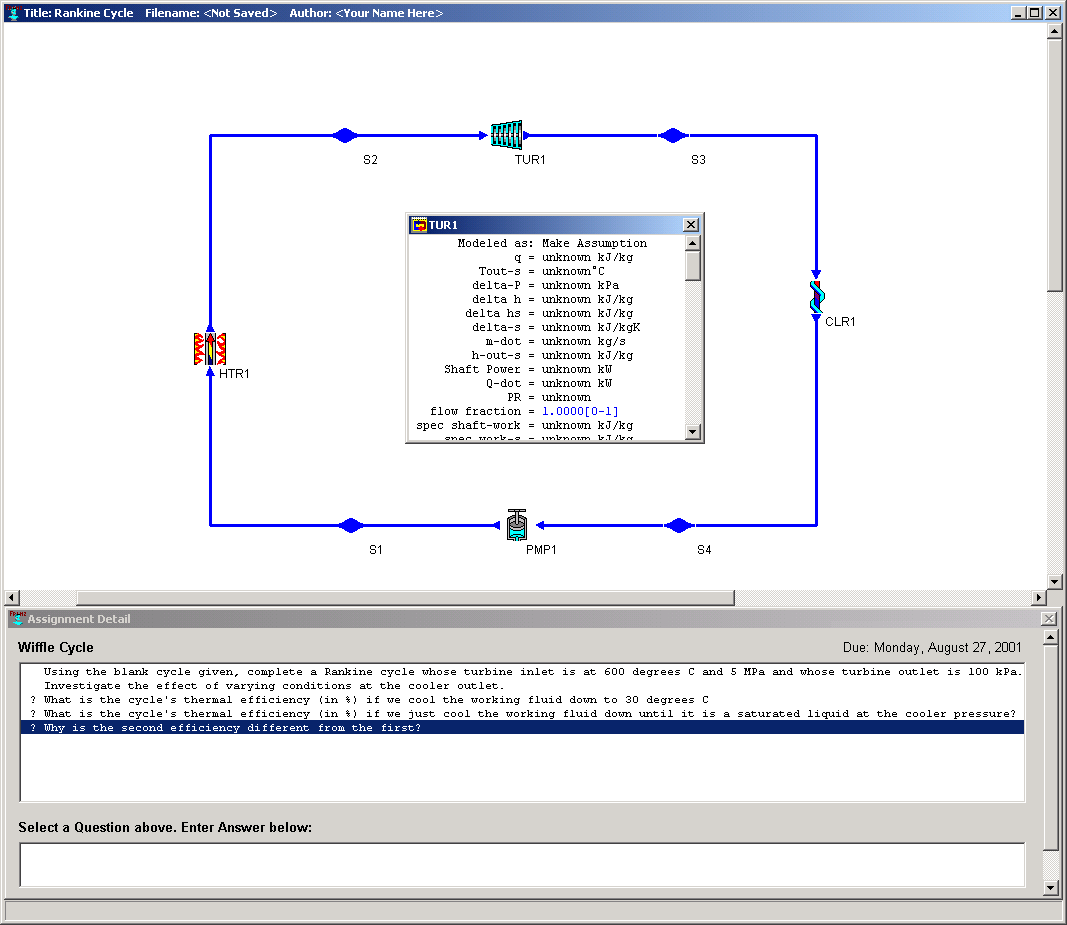
From this point, the student will be able to investigate the cycle (make assumptions, perform sensitivity analyses, et cetera) as well as answer the questions asked by the instructor. When the assignment is complete, the student may submit it electronically using the email coach under the Help menu item
Created with the Personal Edition of HelpNDoc: Generate EPub eBooks with ease